NSX-T Host Preparation

NSX-T is a vast product. On this occasion I want to take a crack at explaining NSX-T host preparation in a visually comprehensible manner. Host prep is the process where NSX-T manager will connect with your ESXi hosts and install VIBS, or VMware proprietary software packages (drivers). These vibs allow your hypervisor to participate in overlay networking, distributed firewall and a slew of other NSX-T features. After the NSX manager is installed and you have registered it with vCenter Server, host preparation is the next step. Not mentioned here are the steps to prepare a KVM host.
Below: NSX-T U.I. showing successful registration with vCenter

For this blog post, I'm going to use a nested ESXi host in my home lab. It has 3 vNic which are perceived as vmnics by the nested ESXi instance:


Through the NSX-T UI, the unprepared ESXi host look like this:
At this point, you could choose to apply a transport node profile, but to keep it simple we're not going to do that. Select the host by clicking the name of the host and when it asks you if you want to make the host a transport node, click yes.

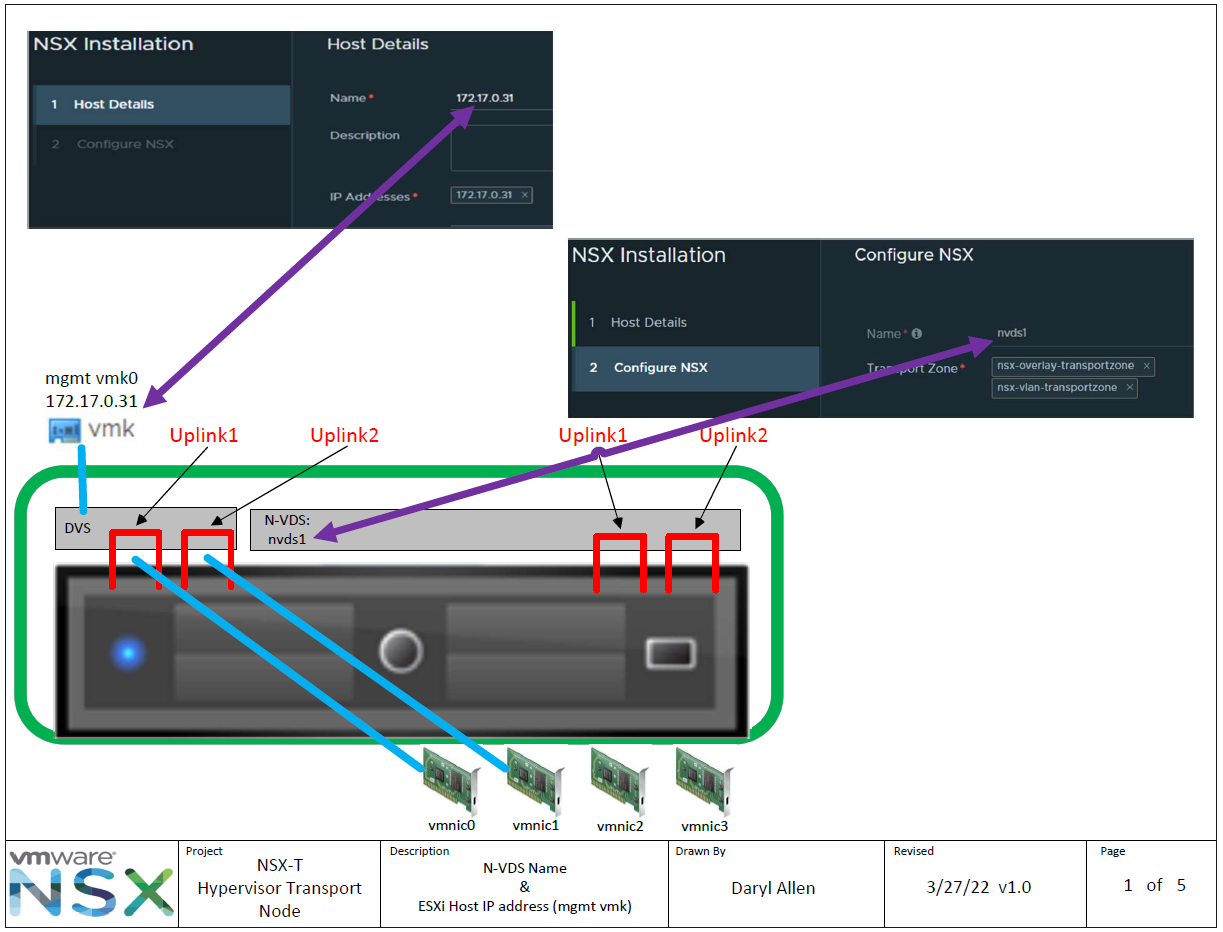
On the first page you'll type an ip address or URL which points to the host's management vmk.

I have chosen to install N-VDS and I have named it nvds1.

Representing the previous two steps visually, it would look something like this:
Based on your predetermined NSX-T architecture, you'll select your overlay transport zone and one or more VLAN transport zones. To keep the scope of this blog post small, I'm going to omit the details of transport zones here. Just know that you'll need to configure them here.
From a visual standpoint I'd like to spend some time on the next part of the NSX-T config which is Uplink Profile. The uplink profile configures how the N-VDS binds to the physical nic of the host, describes the MTU of traffic on the nic and defines what VLAN overlay traffic will use for transport. These bits of information should all have been decided in the architecture and design phase of your NSX-T installation.
You can see that my uplink profile is called "Host-Uplink-Profile". I gave it this unique name because when you create uplink profiles they can be used for hypervisor transport nodes or for edge transport nodes. I want to clearly indicate to myself what this uplink profile is meant to configure. Its a good idea to make meaningful names for your uplink profiles.

If I inspect the uplink profile you can see my GENEVE transport VLAN is 600 and my MTU is configured as 1600.

Regarding overlay network traffic, any segment belonging to the overlay transport zone will always use the default teaming policy.


Additionally, you'll select the method by which your host tep ip addresses are assigned, DHCP or ip pool. In my case, I selected IP pool.
The below screenshot shows the NSX inventory of IP pools


To more closely monitor the installation phase, you can ssh to the host as the vibs are being installed and monitor the vibs being installed by running a tail -f /var/log/esxupdate.log


Once the vibs have been installed successfully and the host becomes a hypervisor transport node, it should appear as follows in the web UI.

You can check the state of the vibs using command: esxcli software vib list | grep nsx

To check for the presence of the nvds and vteps at the host cli, use the following commands:
esxcfg-vswitch -l
esxcfg-vmknic -l
If NSX-T is installed, you should see vmk10, possibly vmk11 if you installed 2 teps, additionally vmk50 which is used in designs that use container networking. In my simple lab, I only have vmk10 and vmk50.

Just like that, we have installed NSX-T on an ESXi hypervisor! NSX-T architectures can get more complex than this, but I think this is a good starting point. If you wish to understand the different NSX-T architectures that are possible, consider downloading the NSX-T design guide for further details!
To install a second tep interface, create a host or edge uplink profile which has a teaming policy of LOADBALANCE Source or LOADBALANCE Source MAC Address.


You can see in my lab host that initially I had only vmk10 (a single tep), then I increased the teps on my host to also include vmk11 as well!


Comments
Post a Comment